“Getting Started with Cloud KMS”
Daftar Isi
Pengantar
Lab praktis ini memungkinkan Anda melakukan aktivitas lab sendiri di lingkungan cloud nyata, bukan di lingkungan simulasi atau demo. Itu dilakukan dengan memberi Anda kredensial sementara baru yang Anda gunakan untuk masuk dan mengakses Google Cloud selama durasi lab.
Praktikum
Task 1. Create a Cloud Storage bucket
- Pick a name for your Cloud Storage bucket
BUCKET_NAME="-enron_corpus"- Now create the bucket by running the following command:
gsutil mb gs://${BUCKET_NAME}Task 2. Check out the data
gsutil cp gs://enron_emails/allen-p/inbox/1. .- Now
tailthe downloaded file to verify the email text is there:
tail 1.Task 3. Enable Cloud KMS
- Run the following in your Cloud Shell session:
gcloud services enable cloudkms.googleapis.comTask 4. Create a Keyring and Cryptokey
- Run the following command in Cloud Shell to set environment variables:
KEYRING_NAME=test CRYPTOKEY_NAME=qwiklab- Execute the
gcloudcommand to create the KeyRing. For this lab you will be using a global location, but it could also be set to a specific region:
gcloud kms keyrings create $KEYRING_NAME --location global- Next, using the new KeyRing, create a CryptoKey named
qwiklab:
gcloud kms keys create $CRYPTOKEY_NAME --location global \
      --keyring $KEYRING_NAME \
--purpose encryption- Open the Key management through the Console by going to the Navigation menu > Security > Key management.
Task 5. Encrypt your data
- Take the contents of the email you looked at earlier and
base64encode it by running the following:
PLAINTEXT=$(cat 1. | base64 -w0)- Using the encrypt endpoint, you can send the base64-encoded text you want to encrypt to the specified key.
curl -v "https://cloudkms.googleapis.com/v1/projects/$DEVSHELL_PROJECT_ID/locations/global/keyRings/$KEYRING_NAME/cryptoKeys/$CRYPTOKEY_NAME:encrypt" \
  -d "{\"plaintext\":\"$PLAINTEXT\"}" \
  -H "Authorization:Bearer $(gcloud auth application-default print-access-token)"\
-H "Content-Type: application/json"- Now that your data is encrypted, you can save it to a file and upload it to your Cloud Storage bucket. To grab the encrypted text from the JSON response and save it to a file, use the command-line utility jq. The response from the previous call can be piped into jq, which can parse out the ciphertext property to the file 1.encrypted. Run the following:
curl -v "https://cloudkms.googleapis.com/v1/projects/$DEVSHELL_PROJECT_ID/locations/global/keyRings/$KEYRING_NAME/cryptoKeys/$CRYPTOKEY_NAME:encrypt" \
  -d "{\"plaintext\":\"$PLAINTEXT\"}" \
  -H "Authorization:Bearer $(gcloud auth application-default print-access-token)"\
  -H "Content-Type:application/json" \
| jq .ciphertext -r > 1.encrypted- To verify the encrypted data can be decrypted, call the
decryptendpoint to verify the decrypted text matches the original email. The encrypted data has information on which CryptoKey version was used to encrypt it, so the specific version is never supplied to the decrypt endpoint. Run the following:
curl -v "https://cloudkms.googleapis.com/v1/projects/$DEVSHELL_PROJECT_ID/locations/global/keyRings/$KEYRING_NAME/cryptoKeys/$CRYPTOKEY_NAME:decrypt" \
  -d "{\"ciphertext\":\"$(cat 1.encrypted)\"}" \
  -H "Authorization:Bearer $(gcloud auth application-default print-access-token)"\
  -H "Content-Type:application/json" \
| jq .plaintext -r | base64 -d- Now that you have verified the text has been encrypted successfully, upload the encrypted file to your Cloud Storage bucket.
gsutil cp 1.encrypted gs://${BUCKET_NAME}Task 6. Configure IAM permissions
- To get the current authorized user, run the command below:
USER_EMAIL=$(gcloud auth list --limit=1 2>/dev/null | grep '@' | awk '{print $2}')- Next, assign that user the ability to manage KMS resources. Run the following
gcloudcommand to assign the IAM permission to manage the KeyRing you just created:
gcloud kms keyrings add-iam-policy-binding $KEYRING_NAME \
    --location global \
    --member user:$USER_EMAIL \
--role roles/cloudkms.admin- Run the following
gcloudcommand to assign the IAM permission to encrypt and decrypt data for any CryptoKey under the KeyRing you created:
gcloud kms keyrings add-iam-policy-binding $KEYRING_NAME \
    --location global \
    --member user:$USER_EMAIL \
    --role roles/cloudkms.cryptoKeyEncrypterDecrypter
Task 7. Back up data on the command line
- First, copy all emails for allen-p into your current working directory:
gsutil -m cp -r gs://enron_emails/allen-p .- Now copy and paste the following into Cloud Shell to back up and encrypt all the files in the allen-p directory to your Cloud Storage bucket:
MYDIR=allen-p
FILES=$(find $MYDIR -type f -not -name "*.encrypted")
for file in $FILES; do
  PLAINTEXT=$(cat $file | base64 -w0)
  curl -v "https://cloudkms.googleapis.com/v1/projects/$DEVSHELL_PROJECT_ID/locations/global/keyRings/$KEYRING_NAME/cryptoKeys/$CRYPTOKEY_NAME:encrypt" \
    -d "{\"plaintext\":\"$PLAINTEXT\"}" \
    -H "Authorization:Bearer $(gcloud auth application-default print-access-token)" \
    -H "Content-Type:application/json" \
  | jq .ciphertext -r > $file.encrypted
done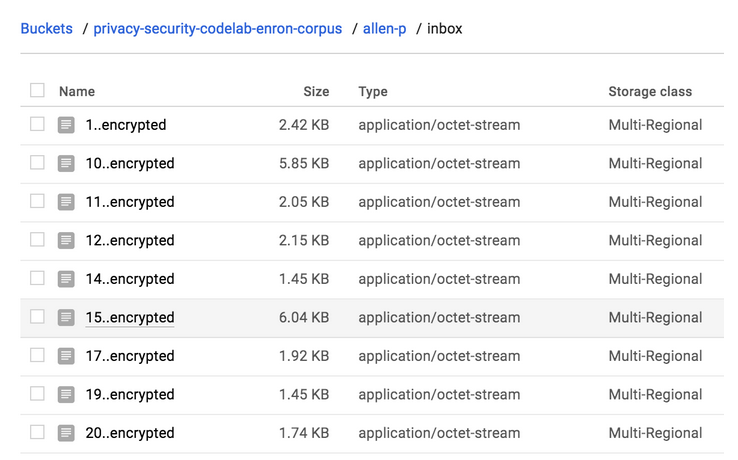
gsutil -m cp allen-p/inbox/*.encrypted gs://${BUCKET_NAME}/allen-p/inbox- To find the files, go to Navigation menu > Cloud Storage > Buckets > YOUR_BUCKET > allen-p > inbox. You should see something like this:
Task 8. View Cloud Audit logs
- To view the activity for any resource in KMS, return to the Cryptographic keys page (Navigation menu > Security > Key management), check the box next to your key ring, then click on the Activity tab in the right menu. This will take you to the Cloud Activity UI, where you should see the creation and all modifications made to the KeyRing.
Penutup
Sahabat Blog Learning & Doing demikianlah penjelasan mengenai Getting Started with Cloud KMS. Semoga Bermanfaat . Sampai ketemu lagi di postingan berikut nya.
(Visited 107 times, 1 visits today)
Related Posts:


")