Aplikasi penskalaan otomatis menggunakan skrip Node.js yang diinstal pada instance Compute Engine. Skrip melaporkan nilai numerik ke metrik pemantauan Cloud. Anda tidak perlu mengetahui Node.js atau JavaScript untuk lab ini. Menanggapi nilai metrik, aplikasi menaikkan atau menurunkan grup instance Compute Engine secara otomatis sesuai kebutuhan.
Give your bucket a unique name, but don’t use a name you might want to use in another project. For details about how to name a bucket, see the bucket naming guidelines. This bucket will be referenced as YOUR_BUCKET throughout the lab.
Accept the default values then click Create.
Next, run the following command in Cloud Shell to copy the startup script files from the lab default Cloud Storage bucket to your Cloud Storage bucket. Remember to replace <YOUR BUCKET> with the name of the bucket you just made:
In the Cloud Console, click Navigation menu > Compute Engine > Instance templates.
Click Create Instance Template at the top of the page.
Name the instance template autoscaling-instance01.
Scroll down, click Advanced options.
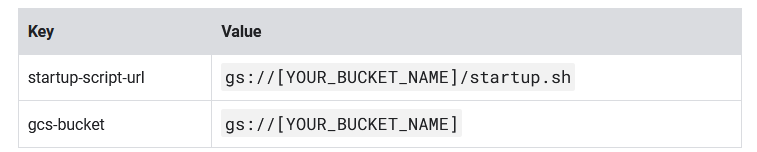
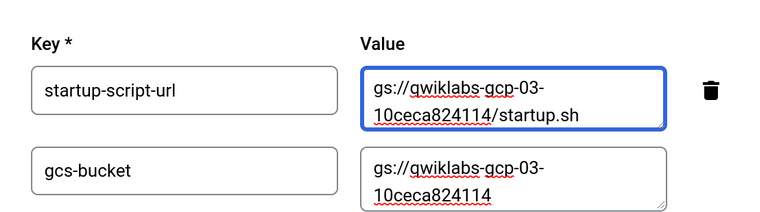
In the Metadata section of the Management tab, enter these metadata keys and values, clicking the + Add item button to add each one. Remember to substitute your bucket name for the [YOUR_BUCKET_NAME] placeholder:
Click Create.
Task 4. Creating the instance group
In the left pane, click Instance groups.
Click Create instance group at the top of the page.
Name:autoscaling-instance-group-1.
For Instance template, select the instance template you just created.
Set Autoscaling mode to Off: do not autoscale.
Click Create.
Task 5. Verifying that the instance group has been created
Task 6. Verifying that the Node.js script is running
Still in the Compute Engine Instance groups window, click the name of the autoscaling-instance-group-1 to display the instances that are running in the group.
Scroll down and click the instance name. Because autoscaling has not started additional instances, there is just a single instance running.
In the Details tab, in the Logs section, click Cloud Logging link to view the logs for the VM instance.
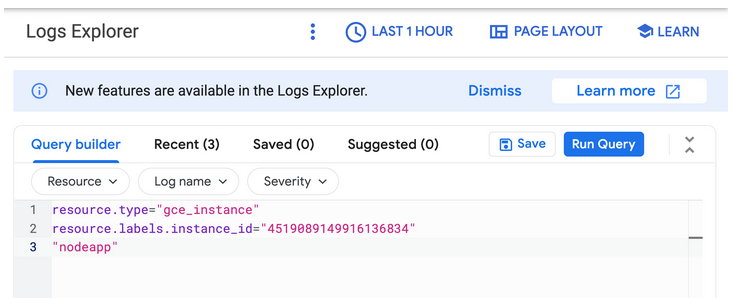
Wait a minute or 2 to let some data accumulate. Enable the Show query toggle, you will see resource.type and resource.labels.instance_id in the Query preview box.
Add “nodeapp” as line 3, so the code looks similar to this:
Click Run query.
Task 7. Configure autoscaling for the instance group
In the Cloud Console, go to Compute Engine > Instance groups.
Click the autoscaling-instance-group-1 group.
Under Autoscaling click Configure.
Set Autoscaling mode to On: add and remove instances to the group.
Under Autoscaling metrics click ADD METRIC to edit metric. Set the following fields, leave all others at the default value.
Metric type: Cloud Monitoring metric

Metric export scope: Time series per instance

Metric identifier: custom.googleapis.com/appdemo_queue_depth_01

Utilization target: 150

Utilization target type: Gauge

Minimum number of instances: 1

Maximum number of instances: 3
Click Save.
Task 8. Watching the instance group perform autoscaling
In the left pane, click Instance groups.
Click the builtin-igm instance group in the list.
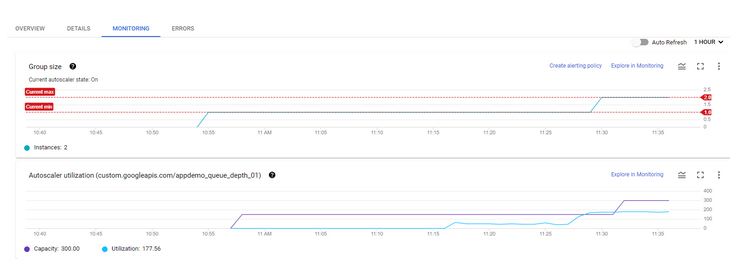
Click the Monitoring tab.
Enable Auto Refresh.
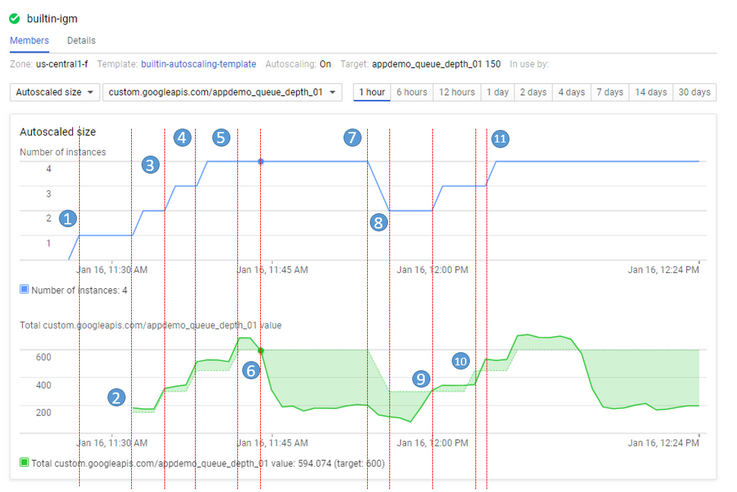
Task 9. Autoscaling example
    11:27 Autoscaling Group starts with a single instance. The aggregate custom metric target is 150.

    11:31 Initial metric data acquired. As the metric is greater than the target of 150 the autoscaling group starts a second instance.

    11:33 Custom metric data from the second instance starts to be acquired. The aggregate target is now 300. As the metric value is above 300 the autoscaling group starts the third instance.

    11:37 Custom metric data from the third instance starts to be acquired. The aggregate target is now 450. As the cumulative metric value is above 450 the autoscaling group starts the fourth instance.

    11:42 Custom metric data from the fourth instance starts to be acquired. The aggregate target is now 600. The cumulative metric value is now above the new target level of 600 but since the autoscaling group size limit has been reached no additional scale-up actions occur.

    11:44 The application script has moved into a low metric 15 minute period. Even though the cumulative metric value is below the target of 600 scale-down must wait for a ten minute built-in scale-down delay to pass before making any changes.

    11:54 Custom metric data has now been below the aggregate target level of 600 for a four node cluster for over 10 minutes. Scale-down down now removes two instances in quick succession.

    11:56 Custom metric data from the removed nodes is eliminated from the autoscaling calculation and the aggregate target is reduced to 300.

    12:00 The application script has moved back into a high metric 15 minute period. The cumulative custom metric value has risen above the aggregate target level of 300 again so the autoscaling group starts a third instance.

    12:03 Custom metric data from the new instance have been acquired but the cumulative values reported remain below the target of 450 so autoscaling makes no changes.

    12:04 Cumulative custom metric values rise above the target of 450 so autoscaling starts the fourth instance.
Penutup
Sahabat Blog Learning & Doing demikianlah penjelasan mengenai Autoscaling an Instance Group with Custom Cloud Monitoring Metrics. Semoga Bermanfaat . Sampai ketemu lagi di postingan berikut nya.


")