Load balancing HTTP(S) Google Cloud diterapkan di edgejaringan Google di titik kehadiran (POP) Google di seluruh dunia. Lalu lintas pengguna yang diarahkan ke load balancer HTTP(S) memasuki POP yang paling dekat dengan pengguna dan kemudian diseimbangkan bebannya melalui jaringan global Google ke backend terdekat yang memiliki kapasitas memadai.
Daftar yang diizinkan/ditolak IP Cloud Armor memungkinkan Anda untuk membatasi atau mengizinkan akses ke load balancer HTTP(S) di tepi Google Cloud, sedekat mungkin dengan pengguna dan lalu lintas berbahaya. Hal ini mencegah pengguna atau lalu lintas jahat menggunakan sumber daya atau memasuki jaringan virtual private cloud (VPC) Anda.
Praktikum
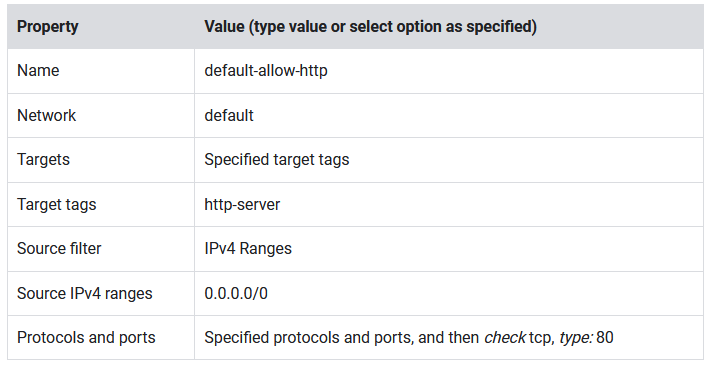
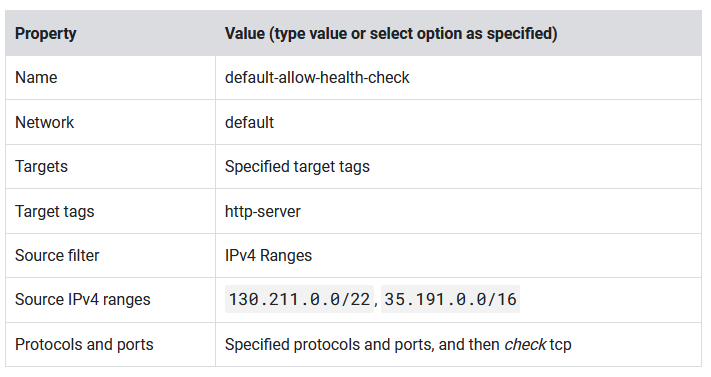
Task 1. Configure HTTP and health check firewall rules
Still in Compute Engine, click Instance groups in the left menu.
Click Create instance group.
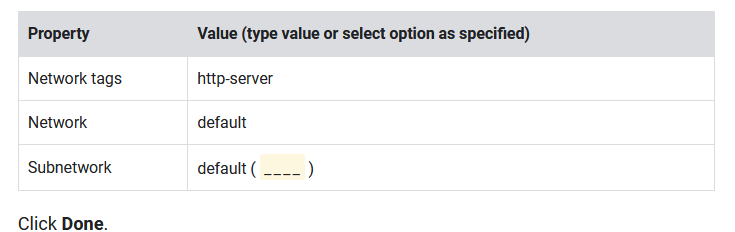
Set the following values, leave all other values at their defaults:
Click Create.
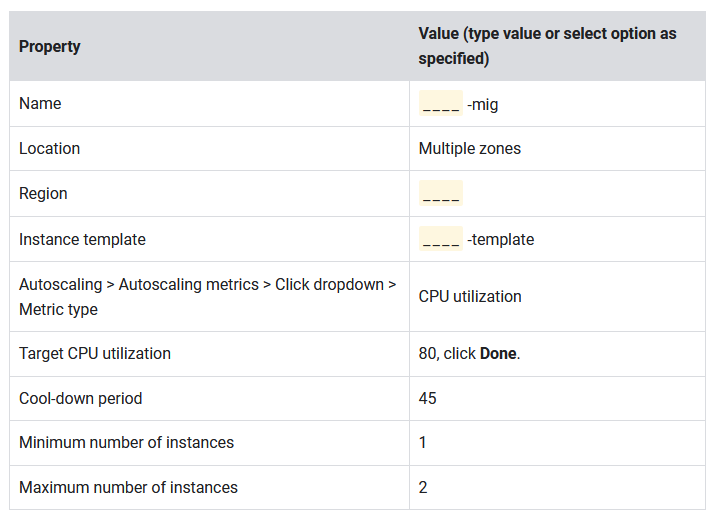
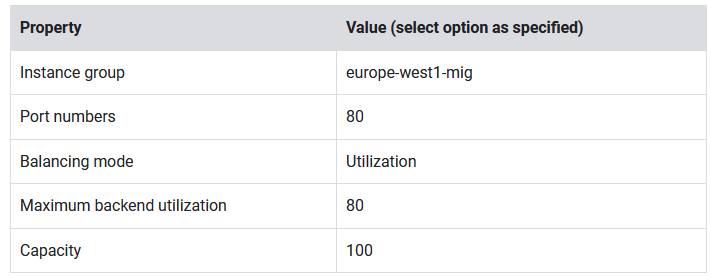
Now repeat the same procedure for create a second instance group for europe-west1-mig in europe-west1:
Click Create Instance group.
Set the following values, leave all other values at their defaults:
Click Create.
Task 3. Configure the HTTP Load Balancer
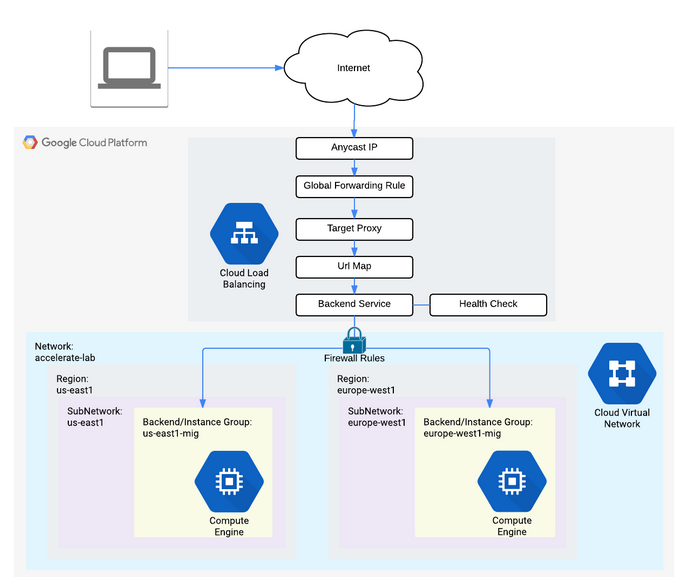
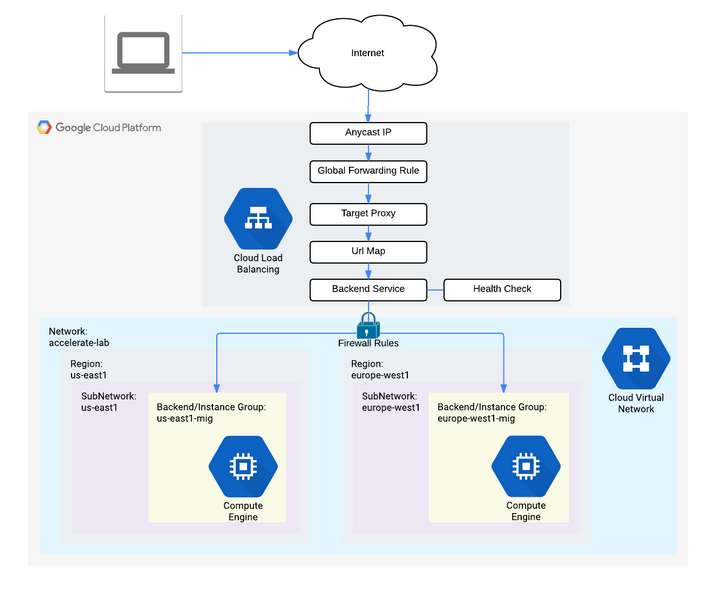
Configure the HTTP Load Balancer to balance traffic between the two backends (us-east1-mig in us-east1 and europe-west1-mig in europe-west1), as illustrated in the network diagram:
Start the configuration
In the Cloud Console, click Navigation menu () > click Network Services > Load balancing, and then click Create load balancer.
Under HTTP(S) Load Balancing, click on Start configuration.
Select From Internet to my VMs or serverless services, and click Continue.
Set the Name to http-lb.
Configure the backend
Backend services direct incoming traffic to one or more attached backends. Each backend is composed of an instance group and additional serving capacity metadata.
Click on Backend configuration.
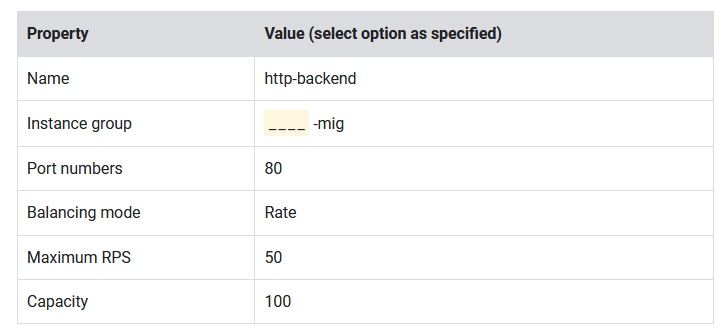
For Backend services & backend buckets, click Create a backend service.
Set the following values, leave all other values at their defaults:
This configuration means that the load balancer attempts to keep each instance of us-east1-mig at or below 50 requests per second (RPS).
Click Done.
Click Add backend.
Set the following values, leave all other values at their defaults:
This configuration means that the load balancer attempts to keep each instance of europe-west1-mig at or below 80% CPU utilization.
Click Done.
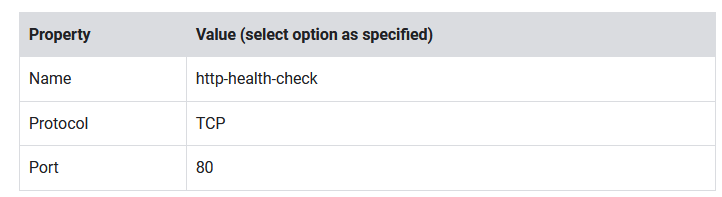
For Health Check, select Create a health check.
Set the following values, leave all other values at their defaults:
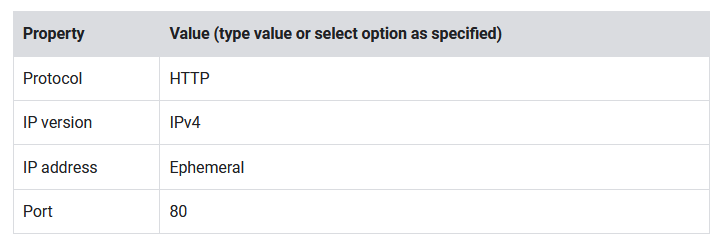
To test IPv4 access to the HTTP Load Balancer, open a new tab in your browser and navigate to http://[LB_IP_v4]. Make sure to replace [LB_IP_v4] with the IPv4 address of the load balancer.
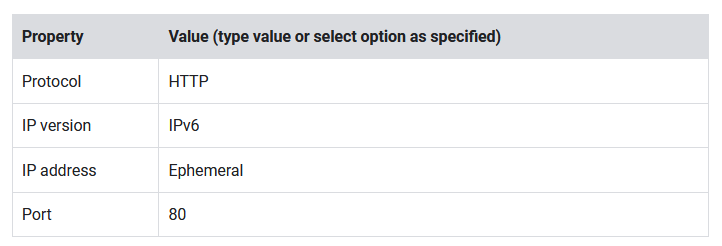
If you have a local IPv6 address, try the IPv6 address of the HTTP Load Balancer by navigating to http://[LB_IP_v6]. Make sure to replace [LB_IP_v6] with the IPv6 address of the load balancer.
Stress test the HTTP Load Balancer
In the Console, navigate to Navigation menu () > Compute Engine > VM instances.
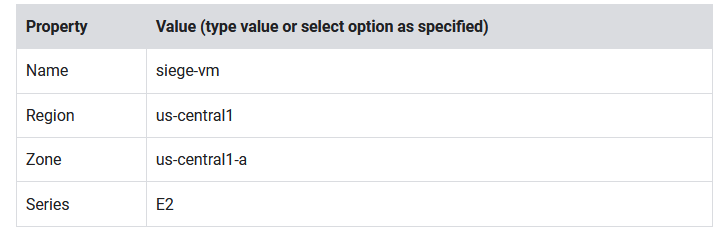
Click Create instance.
Set the following values, leave all other values at their defaults:
Click Create.
Wait for the siege-vm instance to be created.
For siege-vm, click SSH to launch a terminal and connect.
Monitor the Frontend Location (Total inbound traffic) between North America and the two backends for 2 to 3 minutes.
Return to the SSH terminal of siege-vm.
Press CTRL+C to stop siege if it’s still running.
Task 5. Denylist the siege-vm
Create the security policy
In the console, navigate to Navigation menu () > Compute Engine > VM instances.
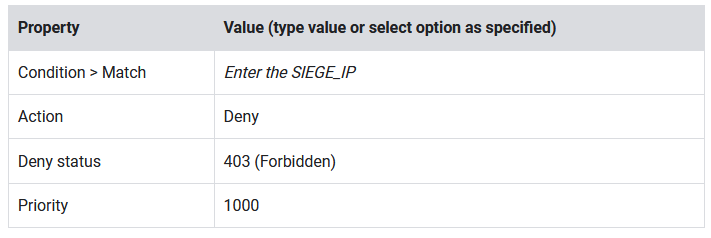
Note the External IP of the siege-vm. This will be referred to as [SIEGE_IP].
In the Cloud console, navigate to Navigation menu > Network Security > Cloud Armor.
Click Create policy.
Set the following values, leave all other values at their defaults:
Click Next step.
Click Add rule.
Set the following values, leave all other values at their defaults:
Click Done.
Click Next step.
Click Add Target.
For Type, select Load balancer backend service.
For Target, select http-backend.
Click Create policy.
Wait for the policy to be created before moving to the next step.
Penutup
Sahabat Blog Learning & Doing demikianlah penjelasan mengenai HTTP Load Balancer with Cloud Armor. Semoga Bermanfaat . Sampai ketemu lagi di postingan berikut nya.
) > VPC network > Firewall.


")