Google App Engine memungkinkan Anda mengelola sumber daya dari baris perintah, men-debug kode sumber dalam produksi, dan menjalankan backend API. Lab ini berkonsentrasi pada layanan backend, menyatukan layanan Pub/Sub, Natural Language, dan Spanner serta API untuk mengumpulkan dan menganalisis umpan balik dan skor dari aplikasi Kuis online.
cd ~/training-data-analyst/courses/developingapps/v1.2/python/pubsub-languageapi-spanner/start

. prepare_web_environment.sh

python run_server.py

cd ~/training-data-analyst/courses/developingapps/v1.2/python/pubsub-languageapi-spanner/start

. run_worker.sh
Check out the Quiz application
In Cloud Shell, click Web preview > Preview on port 8080 to preview the Quiz application.
In the navigation bar, click Take Test.
Click Places.
Answer the question.
Return to the first Cloud Shell window, and press Ctrl+c to stop the web application.
Task 2. Examine the Quiz application code
Review the Google Cloud application code structure
Navigate to the /training-data-analyst/courses/developingapps/v1.2/python/pubsub-languageapi-spanner/start folder using the file browser panel on the left side of the editor.
Select the pubsub.py file in the .../quiz/gcp folder.
This file contains a module that allows applications to publish feedback messages to a Cloud Pub/Sub topic and register a callback to receive messages from a Cloud Pub/Sub subscription.
Select the languageapi.py file in the .../quiz/gcp folder.
This file contains a module that allows users to send text to the Cloud Natural Language ML API and to receive the sentiment score from the API.
Select the api.py file in the .../quiz/api folder. The handler for POST messages sent to the /api/quizzes/feedback/:quiz route publishes the feedback data received from the client to Pub/Sub.
Select the worker.py file in the .../quiz/console folder. This file runs as a separate console application to consume the messages delivered to a Pub/Sub subscription.
Task 3. Work with Cloud Pub/Sub
Create a Cloud Pub/Sub topic
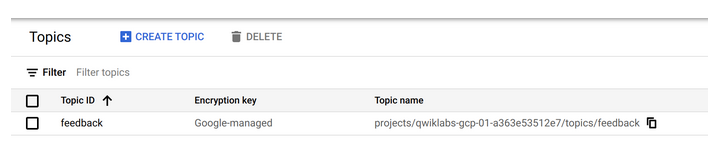
In the Cloud Platform Console, click Navigation menu > Pub/Sub > Topics.
Click CREATE TOPIC.
For Topic ID, type feedback, and then click CREATE TOPIC.
Create a Cloud Pub/Sub subscription
Return to the second Cloud Shell window and press Ctrl+c to stop the application.
Create a Cloud Pub/Sub subscription named worker-subscription against the feedback topic:
Open the ...quiz/gcp/pubsub.py file in the editor.
Load the pubsub_v1 module from the google.cloud package.
Construct a Cloud Pub/Sub Publisher client.
Get the fully qualified path referencing the feedback Pub/Sub topic you created earlier.
quiz/gcp/pubsub.py
# TODO: Load the Cloud Pub/Sub module
from google.cloud import pubsub_v1
# END TODO

# TODO: Create a Pub/Sub Publisher Client
publisher = pubsub_v1.PublisherClient()
# END TODO
# TODO: Create Topic Object to reference feedback topic
topic_path = publisher.topic_path(project_id, 'feedback')
# END TODO
Write code to publish a message to Cloud Pub/Sub
quiz/gcp/pubsub.py
"""
Publishes feedback info
- jsonify feedback object
- encode as bytestring
- publish message
- return result
"""
def publish_feedback(feedback):
# TODO: Publish the feedback object to the feedback topic
    payload = json.dumps(feedback, indent=2,
                                      sort_keys=True)
    data = payload.encode('utf-8')
    future = publisher.publish(topic_path, data=data)
    return future.result()
# END TODO
Write code to use the Pub/Sub publish functionality
quiz/api/api.py
# TODO: Add pubsub to import list
from quiz.gcp import datastore, pubsub
# END TODO
In the publish_feedback(...) function, remove the placeholder pass statement.
Invoke the pubsub.publish_feedback(feedback) function.
Then, return a response to the client indicating that feedback was received.
quiz/api/api.py__, publish_feedback(…) function
"""
Publish feedback
- Call pubsub helper
- Compose and return response
"""
def publish_feedback(feedback):
    # TODO: Publish the feedback using your pubsub module,
    # return the result
    result = pubsub.publish_feedback(feedback)
    response = Response(json.dumps(
                        result, indent=2, sort_keys=True))
    response.headers['Content-Type'] = 'application/json'
    return response
    # END TODO
Run the application and create a Pub/Sub message
In the first Cloud Shell window, restart the web application (if it is running, stop and start it).
Preview the web application.
Click Take Test.
Click Places.
Answer the question, select the rating, enter some feedback text, and click Send Feedback.
In the second Cloud Shell window, to pull a message from the worker-subscription, execute the following command:
Task 5. Subscribe to Cloud Pub/Sub topics programmatically
Write code to create a Cloud Pub/Sub subscription and receive messages
Return to the ...quiz/gcp/pubsub.py file.
Declare a Cloud Pub/Sub Subscriber Client.
Get the fully qualified path referencing the 'worker-subscription'.
Move to the pull_feedback(callback) function, and remove the placeholder pass statement.
Use the subscriber client to subscribe to the worker subscription, invoking the callback when a message is received.
/quiz/gcp/pubsub.py
# TODO: Create a Pub/Sub Subscriber Client
sub_client = pubsub_v1.SubscriberClient()
# END TODO
# TODO: Create a Subscription object named
# worker-subscription
sub_path = sub_client.subscription_path(project_id, 'worker-subscription')
# END TODO
def pull_feedback(callback):
    # TODO: Subscribe to the worker-subscription,
    # invoking the callback
    sub_client.subscribe(sub_path, callback=callback)
    # END TODO
Write code to use the Pub/Sub subscribe functionality
In the ...quiz/console/worker.py file, load the pubsub module from the quiz.gcp package.
In the pubsub_callback(message) function, acknowledge the message
In the main() function, register the handler function as the Pub/Sub subscription callback.
console/worker.py
# TODO: Load the pubsub, languageapi and spanner modules from
# from the quiz.gcp package
from quiz.gcp import pubsub
# END TODO
def pubsub_callback(message):
    # TODO: Acknowledge the message
    message.ack()
    # END TODO
    log.info('Message received')
    # TODO: Log the message
    log.info(message)
    # END TODO
def main():
    log.info('Worker starting...')
    # TODO: Register the callback
    pubsub.pull_feedback(pubsub_callback)
    # END TODO
    while True:
        time.sleep(60)
Run the web and worker application and create a Pub/Sub message
In the first Cloud Shell window, start the web application if it’s not already running.
python run_server.py
In the second Cloud Shell window, start the worker application.
. run_worker.sh
In Cloud Shell, click Web preview > Preview on port 8080 to preview the quiz application.
Click Take Test.
Click Places.
Answer the question, select the rating, enter some feedback text, and then click Send Feedback.
Write code to invoke the Cloud Natural Language API
In the editor, move to the top of the ...quiz/gcp/languageapi.py file.
Load the language module from the google.cloud package.
Load the enums and types modules from the google.cloud.language package.
Create a Cloud Natural Language client object.
Move to the analyze(...) function, and create a Document object to pass to the Natural Language client.
Configure this object with two properties: content and type.
Assign the feedback text to this object’s content property.
Set the type property value to the type that corresponds to PLAIN_TEXT.
Use the Natural Language client object to analyze the sentiment of the document.
Then, return the sentiment score from the Natural Language API.
quiz/gcp/languageapi.py
# TODO: Import the language module
from google.cloud import language_v1
# END TODO
# TODO: Create the Language API client
lang_client = language_v1.LanguageServiceClient()
# END TODO
def analyze(text):
    # TODO: Create a Document object
    doc = language_v1.types.Document(content=text,
                    type_='PLAIN_TEXT')
    # END TODO
    # TODO: Analyze the sentiment
    sentiment = lang_client.analyze_sentiment(
                    document=doc).document_sentiment
    # END TODO
    # TODO: Return the sentiment score
    return sentiment.score
    # END TODO
Write code to use the Natural Language API functionality
In the .../quiz/console/worker.py file, load the languageapi module.
In the pubsub_callback(message) function, and after the existing code, perform sentiment detection on the feedback.
Then, log the score to the console.
Assign a new score property to the feedback object.
Return the message data.
console/worker.py
# TODO: Load the pubsub, languageapi and spanner modules from
# from the quiz.gcp package
from quiz.gcp import pubsub, languageapi
# END TODO
def pubsub_callback(message):
    # TODO: Acknowledge the message
    message.ack()
    # END TODO
    log.info('Message received')
    # TODO: Log the message
    log.info(message)
    # END TODO
    data = json.loads(message.data)
    # TODO: Use the languageapi module to
    # analyze the sentiment
    score = languageapi.analyze(str(data['feedback']))
    # END TODO
    # TODO: Log the sentiment score
    log.info('Score: {}'.format(score))
    # END TODO
    # TODO: Assign the sentiment score to
    # a new score property
    data['score'] = score
    # END TODO
Run the web and worker application and test the Natural Language API
Return to the code editor, and move to the top of the .../quiz/gcp/spanner.py file.
Load the spanner module from the google.cloud package.
Construct a Cloud Spanner client.
Get a reference to the Spanner instance.
Get a reference to the Spanner database.
quiz/gcp/spanner.py
import re
# TODO: Import the spanner module
from google.cloud import spanner
# END TODO
# TODO: Create a spanner Client
spanner_client = spanner.Client()
# END TODO
# TODO: Get a reference to the Cloud Spanner quiz-instance
instance = spanner_client.instance('quiz-instance')
# END TODO
# TODO: Get a reference to the Cloud Spanner quiz-database
database = instance.database('quiz-database')
# END TODO
Move to the saveFeedback(...) function.
Create a database.batch object using a with block. This can be used to perform multiple operations against a Spanner database.
Create a key for the feedback record from the email, quiz, and timestamp properties from the data. For the email property, use the reverse_email(...) function to take the input email and create a reversed string. For example: Input: [email protected] Output: com_example_student_dev_app
Use the batch object to insert a record, using a set of columns and values.
quiz/gcp/spanner.py
def save_feedback(data):
    # TODO: Create a batch object for database operations
    with database.batch() as batch:
    # END TODO
        # TODO: Create a key for the record
        # from the email, quiz and timestamp
        feedback_id = '{}_{}_{}'.format(
                    reverse_email(data['email']),
                    data['quiz'],
                    data['timestamp'])
        # END TODO
        # TODO: Use the batch to insert a record
        # into the feedback table
        # This needs the columns and values
        batch.insert(
            table='feedback',
            columns=(
                'feedbackId',
                'email',
                'quiz',
                'timestamp',
                'rating',
                'score',
                'feedback'
            ),
            values=[
                (
                    feedback_id,
                    data['email'],
                    data['quiz'],
                    data['timestamp'],
                    data['rating'],
                    data['score'],
                    data['feedback']
                )
            ]
        )
        # END TODO
Write code to use the Cloud Spanner functionality
In the .../quiz/console/worker.py file, load the spanner module.
After the existing code in the pubsub_callback(message) function, save the feedback into Spanner.
Log a message to the console to say that the feedback has been saved.
quiz/console/worker.py
# TODO: Load the pubsub, languageapi and spanner modules
# from the quiz.gcp package
from quiz.gcp import pubsub, languageapi, spanner
# END TODO
logging.basicConfig(stream=sys.stdout, level=logging.INFO)
log = logging.getLogger()
def pubsub_callback(message):
    # TODO: Acknowledge the message
    message.ack()
    # END TODO
    log.info('Message received')
    # TODO: Log the message
    log.info(message)
    # END TODO
    data = json.loads(message.data)
    # TODO: Use the languageapi module to
    # analyze the sentiment
    score = languageapi.analyze(str(data['feedback']))
    # END TODO
    # TODO: Log the sentiment score
    log.info('Score: {}'.format(score))
    # END TODO
    # TODO: Assign the sentiment score to
    # a new score property
    data['score'] = score
    # END TODO
    # TODO: Use the spanner module to save the feedback
    spanner.save_feedback(data)
    # END TODO
    # TODO: Log a message to say the feedback
    # has been saved
    log.info('Feedback saved')
    # END TODO
Run the web and worker application and test Cloud Spanner
Save all the files, and then return to the first Cloud Shell window.
Start the web application and then the worker application.
Preview the web application.
Click Take Test > Places.
Answer the questions, select the rating, enter some feedback text, and then click Send Feedback.
Return to the second Cloud Shell window.
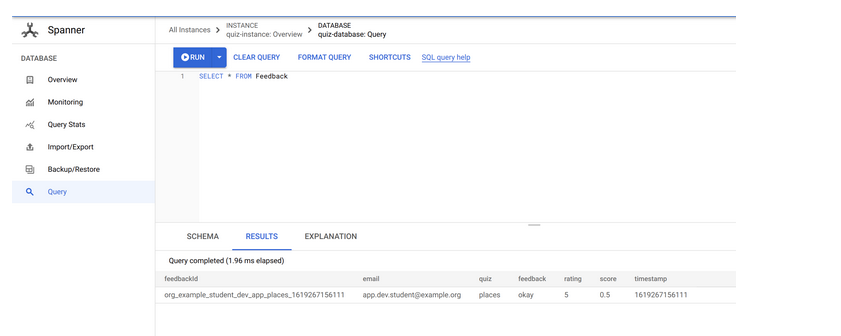
Return to the Cloud Platform Console and click Navigation menu > Spanner.
Select quiz-instance > quiz-database > Query.
To execute a query, for Query, type SELECT * FROM Feedback, and then click Run query.
SELECT * FROM Feedback
Penutup
Sahabat Blog Learning & Doing demikianlah penjelasan mengenai App Dev: Developing a Backend Service – Python. Semoga Bermanfaat . Sampai ketemu lagi di postingan berikut nya.